4 Premium Quality Blogger Templates

We are really proud to present you premium quality blogger templates for free here at Blogger Accessories . This is only the beginning We will upload more blogger templates soon. We will post atleast one blogger template per week .

License : All this templates comes under creative commons 3.0 License . According to creative commons 3.0 you should keep the footer credits.

Box Tube Template :


image #1

it's a two Column Blogger Template. This Template includes navigation bar , feedjit Widget , Social bookmarking sites widget , 3 column footer , related Posts hack , etc


Jumong Blogger Template
:


Jumong is an exclusive Wordpress theme which I converted to Blogger recently . It's a three column widgerized Blogger Template.


more templates coming soon........

2 Add Yahoo Smileys to Blogger Posts - Firefox Users

This Blogger Hack is focused Firefox Users who want to add Yahoo Smileys to Blogger Posts. This hack don't work for other browsers like Internet Explorer , Opera , etc . I kindly request other browser users to see this post " Add Yahoo Smileys to Blogger Posts " , if they want to implement this hack in blogger.

 Yahoo Smileys hack : Firefox users

Firefox users follow this simple steps to add Yahoo smileys to Blogger Posts :

Step 1 :

open Firefox browser and install " Grease monkey " by visiting Grease monkey Addon ! and restart browser .

step 2 :

After installing Grease Monkey , install this Javascript file ( just open th file , Grease monkey will install automatically ) .

step 3 : Go to Layout section of your blog and click Edit HTML subtab . Now add this CSS code above ]]></b:skin>

img.emoticon {
padding: 0;
margin: 0;
border: 0;
}


that's it we have successfully added yahoo Smileys to blogger. celebrate

See you soon with a new hack .

0 Add Yahoo Smileys to Blogger

In this Post I will help you to add Yahoo Smileys ( images ) to blogger posts . you might have noticed in many wordpress blogs there will atleast one Yahoo smileys . As we know expressions speaks more than words , with a single yahoo smiley we can express our mood. In wordpress this feature is build in. But unfortunately blogger doesn't have this feature :( .But here is an easy trick to add yahoo smileys to your blogger posts . if you just type the codes given below you will get yahoo smileys for that simple letters.

for example : if you type
:z you will get :z .

Add Yahoo Smileys to blogger posts

Just Follow this steps to add Yahoo Smileys feature to your blog.

Go to layout section of your blog , then go to Edit HTML section . Search for this following code </head> and add this Javascript before </head> .

<script src='http://wiigames2dl.googlepages.com/yahoosmileys.js' type='text/javascript'/>


Add this yahoo Smileys Javascript code before the head section


that's it , here after whenever you write blog posts just add this yahoo smiley codes . For this simple letter codes you can see beautiful yahoo smileys .

:) --> :)

:( --> :(

:p --> :p

:D --> :D

:$ --> :$

;) --> ;)

:@ --> :@

:# --> :#

:k --> :k

:x --> :x

:o --> :o

:O --> :O

:L --> :L

:r --> :r

:s --> :s

:y --> :y

:~ --> :~

:v --> :v

:f --> :f

:d --> :d

:c --> :c

:z --> :z


troubleshooting : You Must give space before writing yahoo smileys code .

That's it we have added yahoo smileys code to our blogger blog :~ .

See you soon with a new blogger hack.

1 Add navigation or drop down menu in blogger

Here is an easy tutorial to add Navigation Menu or Drop Down Menu in Blogger. With this navigation Menu widget you can display most important links or categories in drop Down Menu format. This navigation Menu is very tiny and you can display as many links you want.

Let us see how to add this Navigation menu widget in Blogger :

Add navigation or drop down menu in blogger


Here is the Default code of Navigation menu :

<form><select name="menu" onchange="window.open(this.options[this.selectedIndex].value,'_blank')"size=1 name=menu>

<option value=0 selected> Type your Navigation Menu Title Here! </option>
<option value=" Url of your Link here "> Title of your link </option> </select></form>


in this above code , you need to edit the text in red to add links .

The text in green color is meant to open links in new window. If you want the links to be opened in same window then replace the text in green to this blank . ( that is delete _ )

if you want to add more links then add the last three lines in violet repeatedly as many times you want.

Look At My code below so that you can get an idea :


<form><select name="menu" onchange="window.open(this.options[this.selectedIndex].value,'_blank')"size=1 name=menu>

<option>- Blogger Accessories- </option>

<!-- change the links with your own -->

<option value="http://bloggeracs.blogspot.com/2008/07/jumong-three-column-blogger-template.html">Jumong Blogger Template</option>

<option value="http://bloggeracs.blogspot.com/2008/07/show-date-before-each-post-in-blogger.html">Show Date before each post</option>

<option value="http://bloggeracs.blogspot.com/2008/07/related-posts-widget-for-blogger.html">Related Posts Widget</option>

<option value="http://bloggeracs.blogspot.com/2008/07/hide-navigation-bar-in-blogger.html">Hide Navigation menu bar in blogger</option>

</select></form>


the result is :


How to Add this Navigation menu / Drop down Menu To my blog ?

It's very simple . First edit the code according to your wish and copy the code .

* Go to Layout section of your template .

* Click Add PageElement tab in sidebar

* Select HTML/JAVASCRIPT subtab

* Paste the Navigation Menu code you copied before there and save .

that's it now you can see a beautiful Navigation Menu in your blog.

See you soon with a new hack .

0 change Blogger Template without deleting widgets

One of the Major Problem Blogger users have is whenever they try to change their templates , They will loss their widgets even if they take backup of their template. After Changing their template , they need to add widgets again manually. It's really annoying and time consuming process.

Is there any way to Backup our Widgets ?

yes . We can backup our widgets before changing our template.

How to backup Blogger Widgets ?


It's really simple guys , before changing template search your widgets code without putting check in expand widgets box.

Select the widget code as shown in the image below.

 Backup Blogger Widgets While Changing Blogger templates tutorial

Now save the widget codes shown in between yellow box to notepad. Copy and Paste all your widget codes.

After doing this Upload your New Template . After uploading you will get a message like this

Blogger Widgets Backup Tutorial


At This stage don't click Confirm & save tab. Rather search for the following code <b:widget id=' , Now paste the widget codes you have saved immediately above or below the code in yellow

 Backup Blogger Widgets While Changing Blogger templates tutorial

After adding the widget codes save your template.
That's it ! Now you will have all widgets that you used in your previous blogger template.

How This works ?

Blogger will keep the widget content on their database with unique widget id.

I hope this hack will be very useful to you guys. Tell me your suggestions in our comment form , If you have any doubts ask there I will help you.

0 Hide / Remove Navigation Bar in Blogger

As we all know in blogger, above header there is navbar or navigation bar . Most of want to hide the navigation bar in blogger , but we don't know how to do that. Never wonder here is a simple trick to hide the navigation bar in blogger .


Follow these easy steps to paste the below CSS code :


CSS code to remove Navigation Bar in Blogger :
/* CSS to hid navigation bar */
#navbar
{
height:0px;
visibility:hidden;
display:none
}

hide Navigation bar in Blogger
Log in to your blogger account and select the Layout of the blog which you want to modify.

Select the tab page Template and then click on Edit HTML

Search for the text : body {

now paste the CSS code above the line in red.

This is how your template HTML code should look after pasting the hack code snippet


That's all. From now onwards your blog will not display navigation bar.

6 Related Posts Widget for Blogger

Related Posts Widget for blogger is what everybody is looking for, In Most of the sites we will find only javascript code and HTML tag for related posts widget. After adding the code to your blog , you can see just a list of related posts without any arrows or style css. So i wanted to embed both in order to make the widget links looks beautiful.


First let's see the usual javascript and HTML Tag. Step 1 : Add the following Javascript code below ]]></b:skin> , thats between ]]></b:skin> and </head> .


<script type="'text/javascript'">
//<![CDATA[
var relatedTitles = new Array();
var relatedTitlesNum = 0;
var relatedUrls = new Array();
function related_results_labels(json) {
for (var i = 0; i < json.feed.entry.length; i++) {
var entry = json.feed.entry[i];
relatedTitles[relatedTitlesNum] = entry.title.$t;
for (var k = 0; k < entry.link.length; k++) {
if (entry.link[k].rel == 'alternate') {
relatedUrls[relatedTitlesNum] = entry.link[k].href;
relatedTitlesNum++;
break;
}
}
}
}
function removeRelatedDuplicates() {
var tmp = new Array(0);
var tmp2 = new Array(0);
for(var i = 0; i < relatedUrls.length; i++) {
if(!contains(tmp, relatedUrls[i])) {
tmp.length += 1;
tmp[tmp.length - 1] = relatedUrls[i];
tmp2.length += 1;
tmp2[tmp2.length - 1] = relatedTitles[i];
}
}
relatedTitles = tmp2;
relatedUrls = tmp;
}
function contains(a, e) {
for(var j = 0; j < a.length; j++) if (a[j]==e) return true;
return false;
}
function printRelatedLabels() {
var r = Math.floor((relatedTitles.length - 1) * Math.random());
var i = 0;
document.write('<ul>');
while (i < relatedTitles.length &amp;&amp; i < 20) {
document.write('<li><a href="' + relatedUrls[r] + '">' + relatedTitles[r] + '</a></li>');
if (r < relatedTitles.length - 1) {
r++;
} else {
r = 0;
}
i++;
}
document.write('</ul>');
}
//]]>
</script>


Step 2 : Check expand widgets and search for <b:loop values='data:post.labels' var='label'> , Now copy and paste the following code in blue between <b:loop values='data:post.labels' var='label'> and </b:loop>


<b:loop values='data:post.labels' var='label'>
<a expr:href='data:label.url' rel='tag'><data:label.name/></a><b:if cond='data:label.isLast != &quot;true&quot;'>,</b:if><b:if cond='data:blog.pageType == &quot;item&quot;'> <script expr:src='&quot;/feeds/posts/default/-/&quot; + data:label.name + &quot;?alt=json-in-script&amp;callback=related_results_labels&amp;max-results=5&quot;' type='text/javascript'/> </b:if> </b:loop>


customize the text in green to show as many links you want.

Step 3 : Now paste the following script the code just below <p><data:post.body/></p> .

code :

<script type='text/javascript'> removeRelatedDuplicates(); printRelatedLabels(); </script>


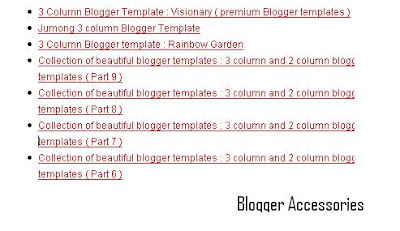
Thats it , now look at the page , it will look like this


You can see there is no styling , I wanted to make it look beautiful . So i made the following changes . Both step 1 and 2 are same , just in step three make some changes .

<div id='related-posts'>
<h2>Other Recommended Posts on This Category</h2>
<script type='text/javascript'> removeRelatedDuplicates(); printRelatedLabels(); </script><
/div>


now its time to add css part for this div section .


/*-- (Related posts widget -below posts) --*/
#related-posts {
float:center;
width:450px;
height:100%;
min-height:100%;
padding-top:5px;
padding-left:5px;
}

#related-posts .widget{
padding-left:6px;
margin-bottom:10px;
background-color:#fff
}

#related-posts .widget h2, #related-posts h2{
font-size: 1.6em;
font-weight: bold;
color: #0000FF;

font-family: Georgia, "Times New Roman", Times, serif;
margin-bottom: 0.75em;
margin-top: 0em;
padding-top: 0em;

}

#related-posts a{
color:#A10000;
}

#related-posts a:hover{
color:#A10000
}

#related-posts ul{
list-style-type:none;
margin:0 0 0px 0;
padding:0px;
text-decoration:bold;
font-size:15px;
text-color:#000000
}

#related-posts ul li{
background:transparent url(http://img152.imageshack.us/img152/3756/bulletzc2.gif) no-repeat ;
display:block;
list-style-type:none;
margin-bottom: 13px;

padding-left: 30px;
padding-top:0px;}


Now look at the page again ,


You can even customize the link color , arrow style , font-size , etc I hope you liked this related posts widget , see you soon with another widget or hack.

0 Backup Blogger Widgets

One of the Major Problem Blogger users have is whenever they try to change their templates , They will loss their widgets even if they take backup of their template. After Changing their template , they need to add widgets again manually. It's really annoying and time consuming process.

Is there any way to Backup our Widgets ?

yes . We can backup our widgets before changing our template.


How to backup Blogger Widgets ?


It's really simple guys , before changing template search your widgets code without putting check in expand widgets box.

Select the widget code as shown in the image below.

 Backup Blogger Widgets While Changing Blogger templates tutorial

Now save the widget codes shown in between yellow box to notepad. Copy and Paste all your widget codes.

After doing this Upload your New Template . After uploading you will get a message like this

Blogger Widgets Backup Tutorial

At This stage don't click Confirm & save tab. Rather search for the following code <b:widget id=' , Now paste the widget codes you have saved immediately above or below the code in yellow

 Backup Blogger Widgets While Changing Blogger templates tutorial

After adding the widget codes save your template.
That's it ! Now you will have all widgets that you used in your previous blogger template.

How This works ?

Blogger will keep the widget content on their database with unique widget id.

I hope this hack will be very useful to you guys. Tell me your suggestions in our comment form , If you have any doubts ask there I will help you.

Subscribers